Angular is a platform
and framework for building client applications in HTML and TypeScript.
Typescript is a superset of Javascript. Angular is written in TypeScript. It
implements core and optional functionality as a set of TypeScript libraries
that you import into your apps. The pioneer building blocks of the Angular
application are NgModules, which provide the compilation context
for components.
We can identify the
following main building blocks of an Angular Application.
1.
Modules
2.
Components
3.
Templates
4.
Metadata
5.
Data binding
6.
Directives
7.
Services
8.
Dependency Injection
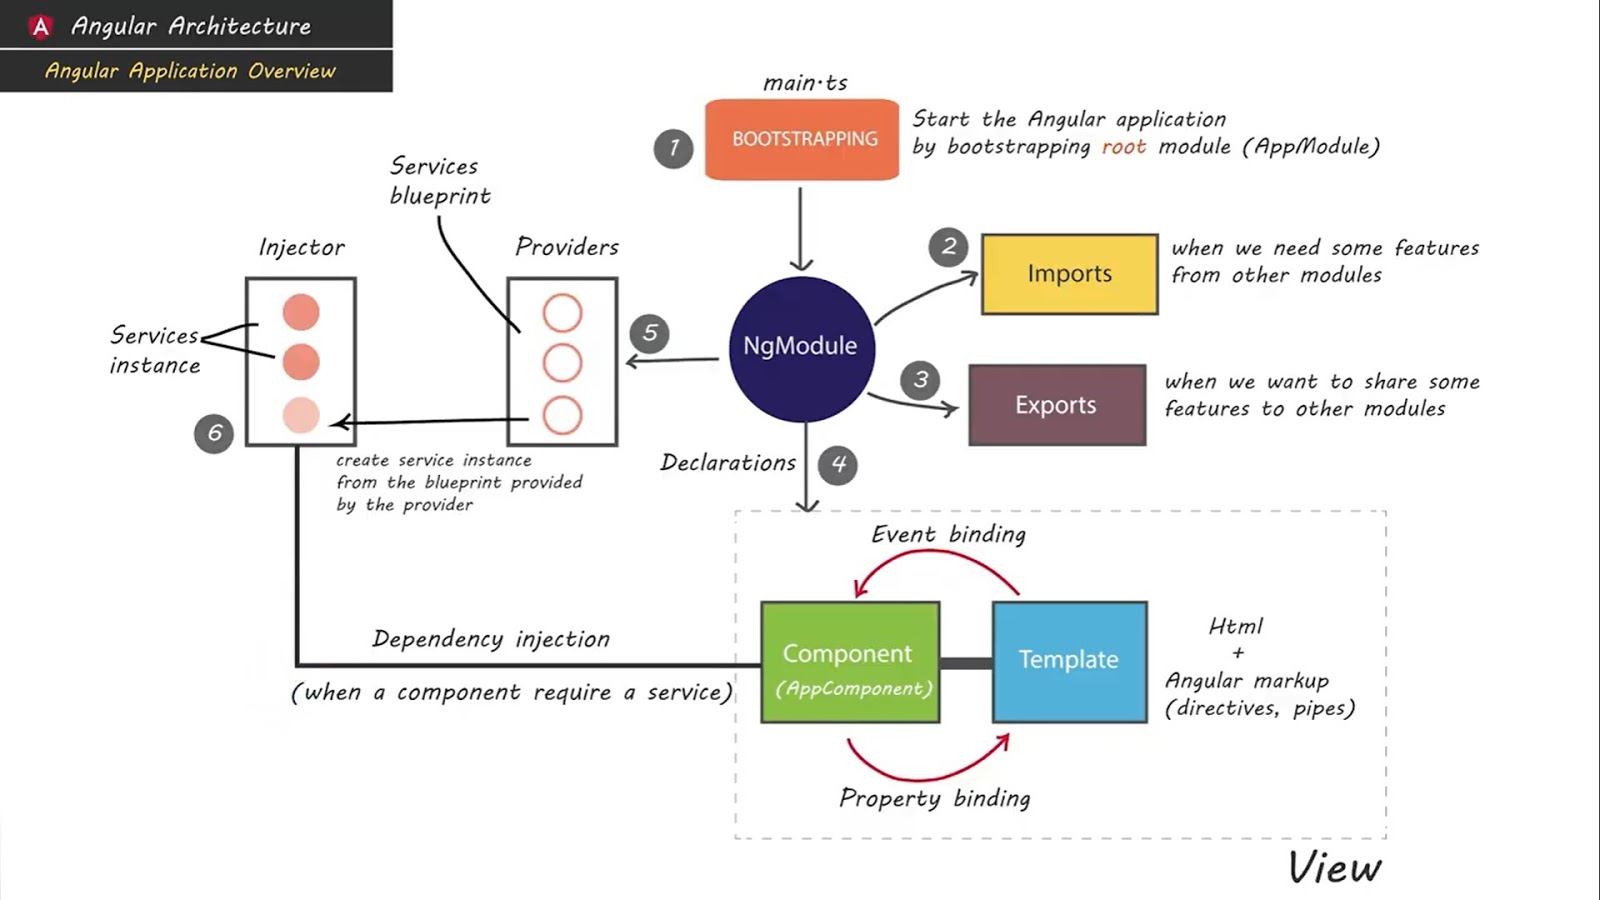
A set of NgModules
defines the angular app, and it always has at least a root module
that enables bootstrapping, and many more feature modules.
- Components define Template
views
- Components use services
The Angular Module (NgModules)
helps us to organize an application into connected blocks of functionality.
Angular Modules
Every Angular app has
a root module, conventionally named AppModule, which provides the bootstrap
mechanism that launches the application. An app typically contains many
functional modules.
//
app.module.ts
import { BrowserModule } from '@angular/platform-browser';
import { NgModule } from '@angular/core';
import { AppRoutingModule } from './app-routing.module';
import { AppComponent } from './app.component';
@NgModule({
declarations: [
AppComponent
],
imports: [
BrowserModule,
AppRoutingModule
],
providers: [],
bootstrap: [AppComponent]
})
export class AppModule { }
If we want to use
another custom Angular module, then we need to register that module inside
the app.module.ts file. Organizing your code into
distinct functional modules helps in managing the development of complex
applications, and in designing for reusability.
Angular Components
Every Angular project
has at least one component, the root component and root
component connects the component hierarchy with a page document object model
(DOM). Each component defines the class that contains application data and logic,
and it is associated with the HTML template that defines the view to
be displayed in a target app.
The @Component
decorator identifies the class immediately below it as the component and
provides the template and related component-specific metadata.
//
app.component.ts
@Component({
selector: 'app-root',
templateUrl: './app.component.html',
styleUrls: ['./app.component.css']
})
Angular Templates
The angular template
combines the HTML with Angular markup that can modify HTML elements before they
are displayed. Template directives provide program logic,
and binding markup connects your application data and the DOM. There
are two types of data binding.
- Event
binding lets your app respond to
user input in the target environment by updating your application data.
- Property
binding lets you interpolate
values that are computed from your application data into the HTML.
<div style="text-align:center">
<h1>
{{2 | power: 5}}
</h1>
</div>
In the above HTML
file, we have used a template. We have also used the pipe inside the template
to transform the values to the desired output.
Angular Metadata
Metadata is used to
decorate the class so that it can configure the expected behavior of a class.
Decorators are the core concept when developing with Angular (versions 2 and
above). The user can use metadata to a class to tell Angular app that
AppComponent is the component. Metadata can be attached to the TypeScript using
the decorator.
//
app.component.ts
@Component({
selector: 'app-root',
templateUrl: './app.component.html',
styleUrls: ['./app.component.css']
})
@Component is a
decorator which makes use of configuration object to create the component and
its view.
Angular Data Binding
Angular allows
defining communication between a component and the DOM, making it very easy to
define interactive applications without worrying about pulling and pushing the
data.
From the Component to the
DOM
Interpolation: {{
value }}: Interpolation adds the value of the property from the component.
<p>Name: {{ student.name }}</p>
<p>College: {{ student.college }}</p>
Property binding:
[property]=”value”
With property binding,
a value is passed from a component to a specified property, which can often be
a simple html attribute.
<input type="text" [value]="student.name" />
<input type="text" [value]="student.college" />
Angular Directives
An Angular component
isn’t more than a directive with the template. When we say that components are
the building blocks of Angular applications, we are saying that directives are
the building blocks of Angular projects. Let us use built-in Angular directive
like ngClass, which is a better example of the existing Angular attribute
directive.
<p [ngClass]="{'coffee'=true, 'red'=false}">
Angular 7 Directives Example
</p>
<style>
.coffee{color: coffee}
.red{color: red}
</style>
Here, based on the [ngClass]
directive’s value, the text has color. In our example, the text will be coffee
because it is true.
Angular Services
For data or logic that
isn’t associated with a specific view, and that you want to share across
components, you create a service class. The @Injectable
decorator immediately precedes the service class definition. The decorator
provides the metadata that allows your service to be injected into
client components as a dependency. Angular distinguishes components from
services to increase modularity and reusability. By separating a component’s
view-related functionality from other kinds of processing, you can make your
component classes lean and efficient.
Angular Dependency Injection
Dependency
injection (DI) lets you keep your component classes lean and efficient. DI
does not fetch data from a server, validate the user input, or log directly to
the console instead they delegate such tasks to the services. DI is wired
into a Angular framework and used everywhere to provide new components with the
services or other things they need. Components consume services; that is, you
can inject a service into a component, giving the component
access to that service class.